Featured

Part 1: Portfolio (Documentation)

Link to the repository: https://github.com/MartinTownley/33537140_AAP_Portfolio

Project 1: FM Soundscape

Audio Render on SoundCloud:

To Run:

If running on Mac, this project contains a shellscript to launch the program from the terminal: cd into the folder, and type “./run.sh”.

Description

This is a soundscape piece demonstrating FM synthesis in C++, using the Maximilian library. It attempts to explore the rich depths of sounds achievable through FM synthesis, possible with a very limited amount of code.
It consists of very simple components:

  • a carrier sine wave, and two modulators (a sine wave and a phasor)
  • a counter/clock
  • a low-pass filter (to curb some of the high frequency content)

What’s going on?

A carrier wave (which in this case is a sine wave) is being modulated by another sine wave, whose frequency is determined by a harmonicity ratio of the carrier.
The amplitude of this first modulating wave is driven by a low-frequency phasor – this gives a a slow-paced tour through some of the sounds that can be achieved through FM synthesis.
The amplitude of this phasor is a fixed value.

Project 2: “The Break-Breaker” (Drum Sample-chopper)

This project demonstrates sample playback techniques and doppler-effect pitch shifting using Maximilian methods. It manipulates drum breaks by dividing the samples into an appropriate amount of start points, and triggering those start points in random sequences (the chopper() and sampleParamsUpadate() functions contain the code for this process). It contains 5 break samples to choose between (and one vocal), or you can edit the code to load your own.
The audio is passed through a “Zinger” effect, which is engaged by holding Q or W. It is essentially a very tight delay line in which a slow phasor is applied to the time of the delay, creating pitch “climbs” and “dives”.
The sample playback speed and delay feedback can be controlled using the GUI.
Each drum break included in the data folder has its own amount of divisions, which is set when the sample is selected. These depend on how many beats-long the sample is, and what I thought sounded good. I attempted to allow the division number to be changed by a GUI while the program was running, but was unable to implement this smoothly.


Note: parts of this code were developed collaboratively with Callum Magillnamely the algorithms that chop up the sample and play it back at the correct speeds. (cmagi001@gold.ac.uk).

Project 3: Karplus-Strong Study

A simple interactive implementation of the Karplus-Strong theorem. The model can be excited by clicking the mouse – the delay time decreases as the mouse-position goes left to right, increasing the perceived pitch of the sound.
A filter is used to take some of the high end out of the initial noise burst. The frequency cutoff of the filter is scaled to a curve, to give more resolution in the low-end.
The OSC code in this project can be ignored – it was written for communication with a Max patch, since this provided a handy reference in the form of a GUI keyboard to experiment (but the Max patch is not necessary for this iteration).

Project 4: 3-D Waveform Visualiser

This project is a prototype of a 3-D waveform visualiser, made in openFrameworks.
It takes data from a given audio file and pushes it into a 2-D vector in segments relative to the audio buffer size, where the outer vectors holds the segments, and the inner vectors contain the amplitude values.
The RMS of each block are calculated manually, and used to determine the height of the 3-D blocks that constitute the visual waveform. The static waveform of the whole audio file is drawn on setup, using a vector of pointers to a Block class.
Playing the audio file colours the waveform accordingly, so that the current play point is tracked. This was achieved by updating a counter each cycle of the audio loop, and using that number to update the blocks that are coloured.
This is a work in progress, as currently the program must be restarted for the visualiser to run again. There is also an issue with the playback – the playback of the audio file alternates between normal speed and half speed each time it loops. I couldn’t figure out why this was the case exactly, though it has something to do with the fact that the program calls “playOnce()” outside the audio loop, in order to retrieve the amplitude values. This somehow causes irregular playback of the file in the audio loop.
Ideally this program will have a scrubbing functionality, where the playhead can be moved by dragging the waveform with the mouse.
Summary

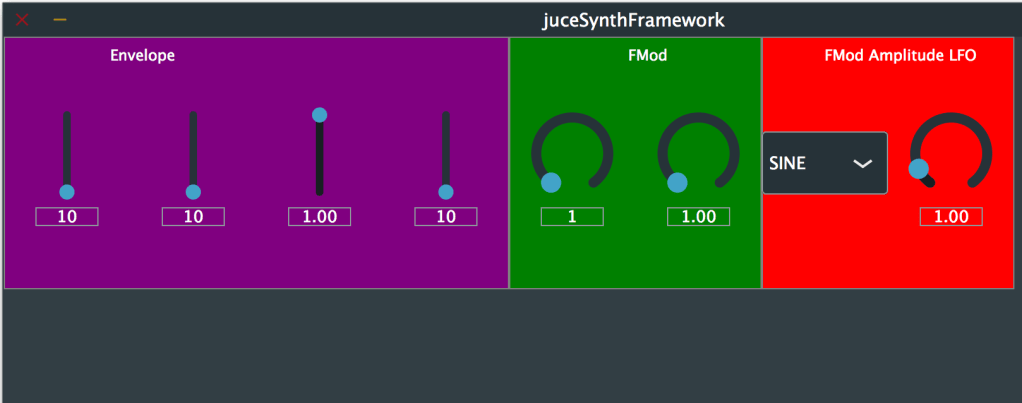
This is an FM synthesiser plugin, made with the JUCE framework.
It is the result of following a lot of tutorial content from The Audio Programmer youtube channel.
The synth has ADSR controls, and a simple FM processing with an LFO.

Project state

Unfortunately the plugin is currently in a state wherein it crashes on exit. This is perhaps something to do with a dangling pointer. Interestingly, the decay parameter can not be mapped to MIDI when the plugin is loaded to a DAW, so I suspect the issue might be with the processor value tree state for the decay parameter. It is advised to click “stop” on Xcode when closing the plugin, rather than closing the window itself.
The plugin will cause the DAW that it’s loaded in to crash on exit, so please be careful. Also I found that changing audio outputs of the DAW while the plugin is loaded causes a crash.

Improvements

I intend to improve the user interface – for now it has a bright colour scheme for the sake of clarity.
I am also going to edit the LFO – currently the LFO switches itself off when the frequency goes below 1. This is because of the multiplications of variables in the DSP block, and dependencies of variables on one another.

Progress

The plugin is now a functioning synthesiser, with basic frequency modulation parameters and ADSR (see following notes on ADSR). Note that the parameters are yet to be labelled and a better colour scheme is to be implemented.

Maximilian ADSR vs JUCE ADSR

For most of the development of this plugin, I just had attack and release envelope parameters, with the view of adding decay and sustain later. Later is now, and having implemented the full ADSR envelope, it didn’t seem to be behaving as it should.
Apparently, lots of people experience issues with maximilian’s ADSR, and I suspect based on my experience that the decay is the issue, since the others seem to work OK.
The issue is addressed on the Audio Programmer youtube channel, which takes you through implementing JUCE’s own ADSR envelope as an antidote:

Setting Sample Rate

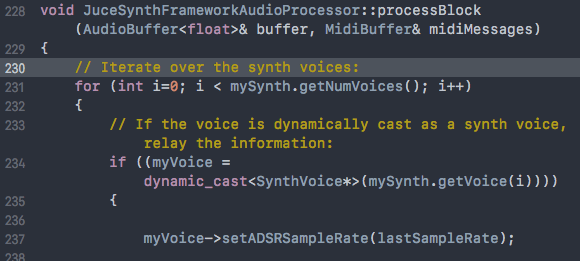
JUCE ADSR implementation requires defining a sample rate in the “processBlock” function of the PluginProcessor, inside the for loop which iterates the voices of the synth and sets the voice parameters:

ADSR Units

According to the ADSR class definition, attack, decay and release time are in seconds, as opposed to Maximilian’s, which are in miliseconds (or samples?)

Part 2a: Building a Synthesiser Framework

A useful tutorial on the Audio Programmer youtube channel takes you through the necessary preparations for creating a synth-based project in JUCE:

Template repo

The video helps you make a nice template for building a synthesiser plugin, so I’ve made a repository for future use:
https://github.com/MartinTownley/JUCEsynthTemplate.git

Projucer Settings

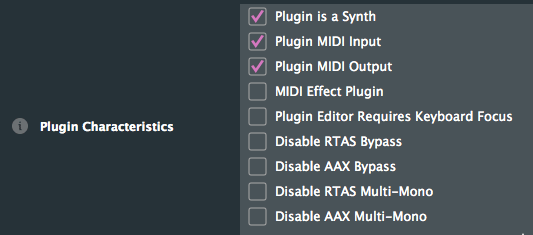
In the Projucer’s Project Settings, under Plugin Characteristics, the checkboxes for “Plugin is a Synth”, “Plugin MIDI Input”, and “Plugin MIDI Output” need to be checked (assuming you want to enable MIDI fuctionality):

You then need to add header header files to the project that will contain subclasses of the SynthesiserSound and SynthesiserVoice JUCE classes. This is explained here if you scroll down to the detailed description:
https://docs.juce.com/master/classSynthesiser.html#details

De-bug using JUCE Plug-In Host

If testing the plugin in Ableton Live or another DAW, generally there’s a need to close and re-open the programme in order for changes to be intialised – this can be time consuming, so instead you can use the plug-in host to de-bug. This involves changing some settings, explained at 10:40 of this video (note that now the Plug-In Host project is located in “extras” rather than “examples”:

Summary of instructions (for MacOS):
1. In XCode, click Product > Scheme > Edit Scheme
2. Select the “Run” tab, click the “Executable” drop-down menu, and select “Other”
3. Navigate to the build file of the Plug-In Host project – JUCE > extras > AudioPluginHost > Builds > MacOSX > build > Debug > AudioPluginHost
4. Click “Choose”

Now when you build your project, the JUCE Plugin Host GUI should open up. You can then drag the build of whatever plugin your working on into the GUI, and connect it to your audio output and/or MIDI input to test. To open your plugin, double-click it in the GUI.
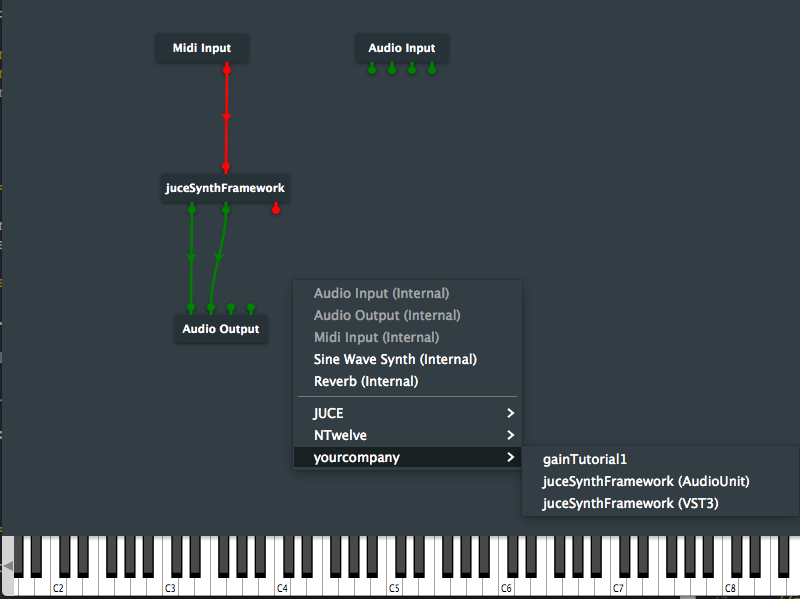
You should also be able to find your plugin by right-clicking in the GUI:

Finally, to avoid loading your plugin into the plugin host each time, go to File>Save As, and save the current state of the plugin host so that it loads up with those settings next time.

MIDI Input Settings

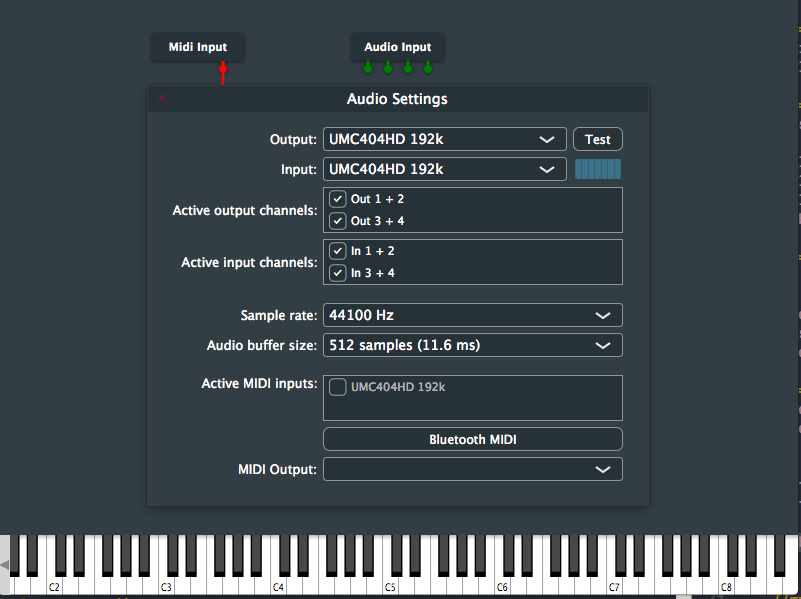
Double click the Midi Input module in the GUI for MIDI input settings, e.g. connecting an external MIDI controller:

Part 2: Project

I will use this opportunity to create an audio plugin with the JUCE framework, using its selection of tutorial content: https://juce.com/learn/tutorials
The nature of the plugin will depend on what I can put together with the various elements built from the tutorial content.

Gain Slider

This simple gain slider plugin was made using tutorials from the Audio Programmer youtube channel (https://www.youtube.com/channel/UCpKb02FsH4WH4X_2xhIoJ1A).
The plugin essentially scales audio samples, using a logarithmic scale.
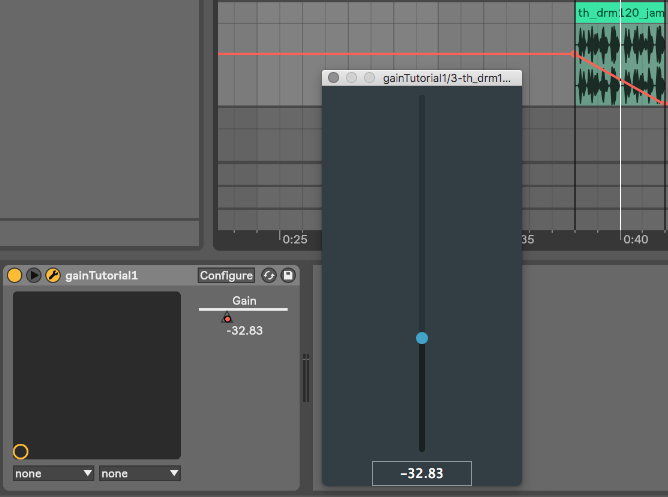
The image shows audio being attenuated through the gain slider in Ableton Live. (I will customise the UI once I have added the element to the main project) :

Repository for source code:
https://github.com/MartinTownley/AAP_gainSlider.git

Adding Parameter Functionality to the Gain Slider

Following on from the previous tutorial, I’ve added parameter control to the gain slider – now the plugin can be adjusted using automation in Ableton or another DAW.
This involved utilising the AudioProcessorValueTreeState class. A couple of interesting things I took away from the tutorial:
1) Variables can, and should, be intialised in an “initialiser list”, rather than inside the constructor.
2) When a destructor is called, class members destruct from the bottom up as they are listed in the header file. This means you have to be careful how you order your class members: for instance, if you have a “slider” member and a “slider value” member, you want to make sure that the slider VALUE member gets destructed before the actual slider. If they’re the other way around, your plugin will crash (as explained in the tutorial video), I suppose because it can’t destruct a slider value member if the slider member has already been destructed.

In general, the tutorial content was quite dense and beyond my understanding. However, I expect I’ll gain a deeper understanding when I try to adapt the code to create parameter control for a different parameter.

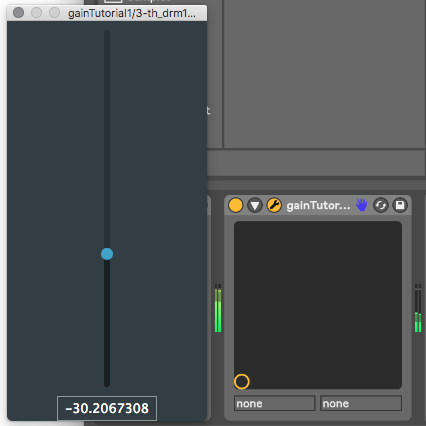
The image below shows the gain slider responding to automation changes in Ableton Live:

Design a site like this with WordPress.com
Get started